

This is a basic "How To" guide to be able to change the oil and oil filter on your motorcycle. This is generally done as part of a service requirement of your bike, at intervals defined within the motorcycles Owners Manual. Generally if you ride your bike a bit harder, or race your motorcycle, it is a good idea to change your oil more regularly, to help reduce wear and tear on your engine.
Further how to guides will be able to be found at www.wtf-racing.com in the future......
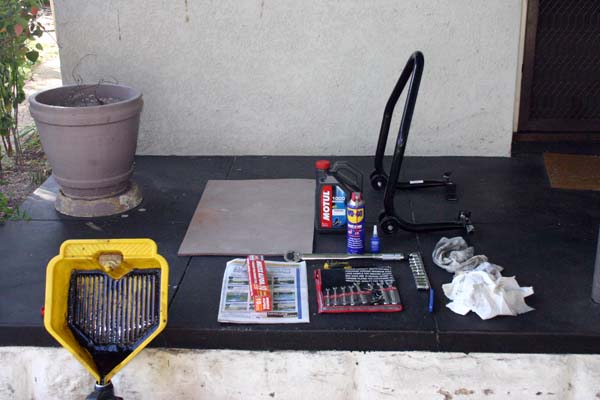
Recommended Tools / Equipment:
Basic Spanner Set
Basic Socket Set
Basic Screwdriver Set
Torque Wrench
Oil Filter Wrench (optional)
Oil PanFunnel
Rags
Rearstand (optional)
Newspaper
Aluminium Foil
New Oil
New Oil Filter
![Image]()
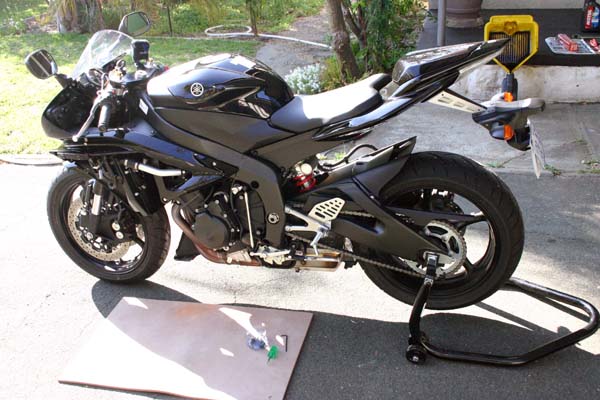
Step One: Set-up Your Bike.
Position your bike on flat, level ground that will allow you to move around and access your bike comfortably, as well as confined spaces make it both difficult to work on your bike, and increase the chance of breaking something due to limited access. If you have a Rear Stand I would suggest you put the bike up on the rearstand for the first part of the job as it will allow you to undo bolts, fasteners etc without fear of pushing the bike over.
Step Two: Remove the Fairings
Remove the fairings from the appropriate side of your bike to be able to get access to both the oil drain bolt, and the oil filter. Follow the instructions outlined within your owners manual.
![Image]()
I suggest you have a small container that you are able to put all the loose fastners and bolts into to ensure they don't get lost. Once all the bolts & fasteners are removed, carefully remove the fairings and place them on a soft surface to ensure that they are not scratched accidentally.
![Image]()
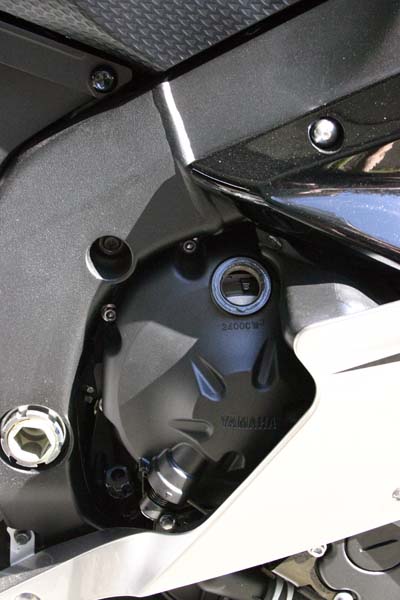
Step Three: Ensure Access to Drain Bolt and Oil Filter.
Ensure you have complete access to your Oil drain Bolt, and the Oil Filter. As you can see I had to remove the shifter rod of the rearsets some drainage hoses to be able to get complete access to the Oil Filter.
![Image]()
Step Four: Protect Headers.
You may find that the position of the Oil Drain Plug, or the Oil filter may allow oil to run down and over the headers/engine of your bike. I suggest that where possible youe prevent this happening by using some aluminium foil to protect these items. There is almost nothing worsde than completing an oil change, and then smelling burning oil for the next 20km's as it is burnt off the headers or engine.
![Image]()
At this point you have everything set-up, and you should be able to begin to change the oil. Before draining the oil, it is recommended that you run the engine for a few minutes to allow it to get warm. Oil gets thinner as it is heated up, so warming up the oil allows you to remove more of the old oil from the system before it is replaced with new oil.
Step Five: Drain the oil.
Run the engine for a few minutes until it gets to operating temperature, and then turn of the motorcycle. You then need to open the oil filler cap. This should be easily accesible on the right hand side of the motorcycle. This is opened to allow air into the oil system of the motorcycle, and reduce the amount of mess that may occur while draining the oil.
![Image]()
Once the oil filler cap is removed, place newspaper underneth the bike to protect the ground from contamination, and position the Oil Pan underneth the Oil Drain Plug. Once these are in position, you can carefully remove the Oil Drain Plug. Watch the flow of the oil to ensure it won't miss the Oil Pan.
![Image]()
Step 6: Remove the Oil Filter.
While the oil is draining from the sump, you can remove the oil filter. If you have the Filter wrench, this is a little easier, however there is a simple alternative. Using a screwdriver and hammer, carefully pierce the Oil filter in the end, and then angle it through and pierce it out the side of the filter. This will give you enough leverage to be able to unscrew the old Oil Filter. Once it is off, ensure that the filter mating surface on the engine has no muck on it.
![Image]()
Once this has been let drain a bit, the new oil filter can be installed.
Step Seven: Install the new Oil Filter.
Before installing the new filter, compare it to the old one. As can be seen, the new filter I have chosen is slightly different, because it has a tightening nut on the end of it. It is also cross drilled to allow easy wiring for racing.
![Image]()
The new filter needs to have a thin coat of oil applied to the o-ring before installation. Initially install the new filter by hand to ensure it is not cross-threaded, and that the o-ring is seated correctly. Once this is done, the filter can be tightened to 12ft-lbf torque.
Step Eight: Installing the Oil Drain Plug.
This is simply a reversal of the removal process. Before putting the plug back into the sump, check the washer for damage, and replace it if necessary. Once this is checked, put the Oil Drain Plug back into the sump, being careful not to cross-thread it. Once it is finger tight, use the torque wrench to tighten it to 31 ft-lbf.
![Image]()
Step Nine: Filling With New Oil.
All that is left to do is to fill the engine/gearbox with new oil, and check the level. Using a Funnel, fill the bike with 2.4L for just an oil change, and 2.6L for an oil and filter change.
Once you have put in the recommended amount of oil (being careful not to spill any), it is time to re-install the oil filler cap, and then run the engine until the new oil is warm. As the engine is running, check for any oil leaks. Once it is warm, remove the bike from the rearstand, and check the oil level. This may be done by either checking through the clear window on the rHS of the bike, below the Oil Filler Cap, or using the dipstick provided (refer to your owners manual to find out which is applicable for your bike). If the oil is low, top it up, and re-check the level.
Step Ten: Re-install Fairings, Gear Selector Rod & Hoses.
All that is left to do is return the overflow hoses back to their original position around the filter, re-install the gear-selector rod, and re-install the fairings. Remember, if you have a bolt left, there is something missing. Do this very carefully, and there should be no bolts/fasteners left.
There you have it, you should have successfully completed an oil and filter change on your bike.
Cheers
Simmo
Further how to guides will be able to be found at www.wtf-racing.com in the future......
Recommended Tools / Equipment:
Basic Spanner Set
Basic Socket Set
Basic Screwdriver Set
Torque Wrench
Oil Filter Wrench (optional)
Oil PanFunnel
Rags
Rearstand (optional)
Newspaper
Aluminium Foil
New Oil
New Oil Filter
Step One: Set-up Your Bike.
Position your bike on flat, level ground that will allow you to move around and access your bike comfortably, as well as confined spaces make it both difficult to work on your bike, and increase the chance of breaking something due to limited access. If you have a Rear Stand I would suggest you put the bike up on the rearstand for the first part of the job as it will allow you to undo bolts, fasteners etc without fear of pushing the bike over.
Step Two: Remove the Fairings
Remove the fairings from the appropriate side of your bike to be able to get access to both the oil drain bolt, and the oil filter. Follow the instructions outlined within your owners manual.

I suggest you have a small container that you are able to put all the loose fastners and bolts into to ensure they don't get lost. Once all the bolts & fasteners are removed, carefully remove the fairings and place them on a soft surface to ensure that they are not scratched accidentally.
Step Three: Ensure Access to Drain Bolt and Oil Filter.
Ensure you have complete access to your Oil drain Bolt, and the Oil Filter. As you can see I had to remove the shifter rod of the rearsets some drainage hoses to be able to get complete access to the Oil Filter.

Step Four: Protect Headers.
You may find that the position of the Oil Drain Plug, or the Oil filter may allow oil to run down and over the headers/engine of your bike. I suggest that where possible youe prevent this happening by using some aluminium foil to protect these items. There is almost nothing worsde than completing an oil change, and then smelling burning oil for the next 20km's as it is burnt off the headers or engine.

At this point you have everything set-up, and you should be able to begin to change the oil. Before draining the oil, it is recommended that you run the engine for a few minutes to allow it to get warm. Oil gets thinner as it is heated up, so warming up the oil allows you to remove more of the old oil from the system before it is replaced with new oil.
Step Five: Drain the oil.
Run the engine for a few minutes until it gets to operating temperature, and then turn of the motorcycle. You then need to open the oil filler cap. This should be easily accesible on the right hand side of the motorcycle. This is opened to allow air into the oil system of the motorcycle, and reduce the amount of mess that may occur while draining the oil.
Once the oil filler cap is removed, place newspaper underneth the bike to protect the ground from contamination, and position the Oil Pan underneth the Oil Drain Plug. Once these are in position, you can carefully remove the Oil Drain Plug. Watch the flow of the oil to ensure it won't miss the Oil Pan.

Step 6: Remove the Oil Filter.
While the oil is draining from the sump, you can remove the oil filter. If you have the Filter wrench, this is a little easier, however there is a simple alternative. Using a screwdriver and hammer, carefully pierce the Oil filter in the end, and then angle it through and pierce it out the side of the filter. This will give you enough leverage to be able to unscrew the old Oil Filter. Once it is off, ensure that the filter mating surface on the engine has no muck on it.

Once this has been let drain a bit, the new oil filter can be installed.
Step Seven: Install the new Oil Filter.
Before installing the new filter, compare it to the old one. As can be seen, the new filter I have chosen is slightly different, because it has a tightening nut on the end of it. It is also cross drilled to allow easy wiring for racing.

The new filter needs to have a thin coat of oil applied to the o-ring before installation. Initially install the new filter by hand to ensure it is not cross-threaded, and that the o-ring is seated correctly. Once this is done, the filter can be tightened to 12ft-lbf torque.
Step Eight: Installing the Oil Drain Plug.
This is simply a reversal of the removal process. Before putting the plug back into the sump, check the washer for damage, and replace it if necessary. Once this is checked, put the Oil Drain Plug back into the sump, being careful not to cross-thread it. Once it is finger tight, use the torque wrench to tighten it to 31 ft-lbf.

Step Nine: Filling With New Oil.
All that is left to do is to fill the engine/gearbox with new oil, and check the level. Using a Funnel, fill the bike with 2.4L for just an oil change, and 2.6L for an oil and filter change.
Once you have put in the recommended amount of oil (being careful not to spill any), it is time to re-install the oil filler cap, and then run the engine until the new oil is warm. As the engine is running, check for any oil leaks. Once it is warm, remove the bike from the rearstand, and check the oil level. This may be done by either checking through the clear window on the rHS of the bike, below the Oil Filler Cap, or using the dipstick provided (refer to your owners manual to find out which is applicable for your bike). If the oil is low, top it up, and re-check the level.
Step Ten: Re-install Fairings, Gear Selector Rod & Hoses.
All that is left to do is return the overflow hoses back to their original position around the filter, re-install the gear-selector rod, and re-install the fairings. Remember, if you have a bolt left, there is something missing. Do this very carefully, and there should be no bolts/fasteners left.
There you have it, you should have successfully completed an oil and filter change on your bike.
Cheers
Simmo


